
UPDATED on 11April 2016
Note: Since I posted this, I have had quite a lot of queries and feedback on the finer points of making homemade yogurt. Based on all this discussion, I have added in some new photos for better illustration as well as some specific points on the cooking process. Hope this helps!
For someone who loves her yogurt with a passion, it has never occurred to me to make my own yogurt until a few years back. I came across many blogs that sang the praises of homemade yogurt, and thought what a great idea that was.
Homemade yogurt has no addictives, preservatives or colouring, and certainly none of that mouth-puckering aftertaste or bite. It is way cheaper than commercial ones. You can control the sweetness of it and make it as creamy or as watery as you like. Perfecto!
 |
To get a good feel about the whole process, I must have read about 20+ different postings on how to make yogurt. The most common method seems to follow this: boil the milk, cool it down to 45celcius, mix the starter, set it in the microwave, and lastly set it in the fridge.
So I thought that sounds do-able. On my first attempt, I started around 2pm, and had to set my alarm at 12.30AM (yes that's twelve thirty MIDNIGHT) to finish off the last step. However, after experimenting with it a few times, there are a few details that kept bugging me.
1. Like boiling the milk. I have a bad habit of multitasking on a million things, so keeping an eye on boiling stuffs (like milk and porridge which boils over VERY easily, and require constant stirring to prevent browning) does not really work with me ;P
2. Like waiting for the milk to cool to 45degree celcius. It took almost two hours, and I was hotfooting like a cat on hot coals. Patience - not my best virtue ;P
3. Like setting it aside for 8 hours....again, patience is not my key strength.
Finally, after multiple rounds of making it, it finally dawned on me what is the ultimate shortcut.
Homemade Yogurt - the Ultimate, Fuss Free Way
The basic ingredients remain...
- 1 litre of fresh pasteurised milk (Best is either Farm Fresh or Bright Cow. The newest brand in the market now is Summerfield but I havent tried them).
- 3 tbspn of store-bought, plain yogurt as the starter (I like Nestle Plain Yogurt).
Method
1. Pour the milk into a heavy based saucepan and heat up to 55celcious on medium heat. Stir gently to distribute the heat. Use a thermometer to check the temperature.
2. Remove from fire, and let it cool back down to 45celcious. This should take anything from 10-30minutes, depending if you have a fan to cool it down faster. Scoop out about half a cup of milk into a bowl and mix in the starter yogurt. Stir until the starter is evenly mixed into the milk, then pour everything back into the pot. Stir gently to distribute the starter.
3. Now here is my No. 1 shortcut. If you have a thermal cooker - pour the milk into the thermal cooker, cover and let it set for 4 hours and it's done. You will get a pot of beautifully set yogurt that's thick and creamy. This is now my favourite way to make yogurt. The thermal cooker retains the warmth and speed up the fermentation, hence cutting short the time needed by half. The texture is thick and creamy.
4. If you don't have a thermal cooker, GO GET ONE. Okay okay, in the absence of a thermal cooker, my No. 2 shortcut is to cover the pot and leave it in a quiet corner / in your oven / microwave - basically a corner that's free from draft. Leave it for at least 8-10 hours before keeping it in the fridge. This method will yield a yogurt texture that's slightly more runny and sour than the thermal cooker method.

I make yogurt regularly so it is practical for me to get this mini thermal cooker. It's available from Aeon and Parkson for around RM80.

The inner pot has a capacity of just over 1 litre so it is perfect to make a 1 litre batch of yogurt. Heat the milk directly in this inner pot, stir in the starter yogurt, and put the inner pot straight into the outer green pot. Cover and let it sit for 4 hours, and it's done.
 |
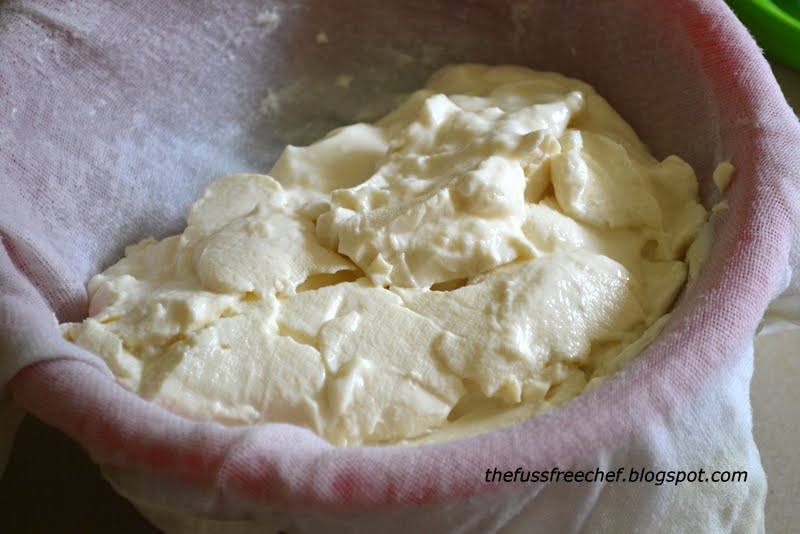
To make greek yogurt, you will need:
1. A deep bowl
2. A piece of clean muslin cloth (I use a piece of new/unused and clean baby nappy cloth)
3. A round plastic sift
Line the muslin cloth over the sift and place the sift ontop of a deep bowl. Pour the yogurt evenly over the entire sift. Cover it and put into the fridge for at least 8 hours or overnight. The whey from the yogurt will drip out, leaving a thick layer of greek yogurt.
 |
| Strain it like so. |
 |
| Thick and creamy. Just like cream cheese. Minus the calories. |
 |
| Another batch that I made recently, it is so thick, almost curdlike. |
 |
| Lift up the muslin cloth and it will fold over like a lazy sleepyhead! |
 |
| Greek yogurt is at its thickest straight out of the fridge. The longer you leave it out in room temperature, it will become slightly runny again. |
Best ways to eat yogurt:
1. Have it with muesli and bananas for breakfast

2. As a healthy fruit salad whenever the mood strikes

3. Blend it with fruits for a great tasting smoothie.
 |
| Durian Smoothie |
4. Strain it into a thick and creamy texture, and make your own Greek style herb yogurt cheese dip.
Here are some great recipes using either homemade yogurt or greek yogurt.
Yogurt Cream Cheese with Mix Herbs
Lamb Meatballs with Yogurt Dip
Durian Yogurt Cake
Chocolate and Baileys Frozen Yogurt
Homemade Kefir
Avocado Mousse with Gula Melaka
Moist and Sticky Chocolate Cake
Pumpkin Chocolate cake
Ooooo.....durian yogurt smoothie! It has been ages since I made yogurt. My yogurt maker is in hibernation and this post certainly is motivation for me to take it out and make some. I used to have banana yogurt smoothies with frozen berries for breakfast. Is that delicious or what!
ReplyDeleteI love the idea of banana smoothie with frozen berries as breakfast. Such a treat ;)
DeleteSo sweet of you to drop by my blog. Your yoghurt look interesting and versatile!
ReplyDeleteThanks Cheah :) love your blog, learned alot from your postings :)
DeleteOh wow, durian smoothie with home made yoghurt. No one can beat that. Sure takes alot of patience to make yoghurt. Well done!
ReplyDeleteThanks Mich! Takes s long time but well worth it :). Can make lotsa other stuffs from yogurt.
DeleteEsther, you have lovely photos. Are you using a DSLR?
DeleteThanks Mich! Yes i am.
DeleteEsther, you have got me very intrigued! Where do i buy the starter? I need to get a food thermometer. The last time I tried to use my kids' thermometer and almost spoilt it :p
DeleteJust buy the smallest tub of plain yogurt as your starter. Then once your own homemade batch is ready, saved some as your next starter. Food thermometer? No need la, i use my kid's one heehee. 40degree celcius wont spoil it :)
Deletesound so good and healthy!
ReplyDeleteThanks Sonia!
Deletethis is real good i shall try
ReplyDeletethks for sharing :)
Most welcome, Alice!
ReplyDeleteah! i must make this soon! should have kept some of ur yogurt for starter. HAHA
ReplyDeleteOh yea...me so absent minded, didnt thought of that either...never mind, just use half of the small tub and make sure you shake it properly first.
DeleteEsther this one didn't work for me :( used pot set natural yoghurt and it didn't mix that well with the milk as it's quite solid. Any tips?
ReplyDeleteHi Marianne, i'm not sure what's pot set, but most store bought yogurt usually are already semi solid. Just buy the smallest carton you can find, here we can get them in 140g or 100g. The trick is, before you tear open the seal, to give it a few vigorous shake, so as to break up the solids and make it creamy again. Then scoop out 3 tbspn into a separate bowl, and mix it with a few scoops of the warm milk. Stir until the mixture is smooth and well mixed. Then pour everything back into the pot of warm milk and stir gently a few rounds. Remember, whatever form, texture and taste of the starter you mix in, that is how your yogurt batch will turn out. This should work. Let me know how it turns out ya. There are also a few other variables like the weather temperature, the temperature of the milk when you mix in the starter, so it takes a few rounds to get the hang of it.
DeleteThanks Esther! And for your banana advice too. Will be making that this weekend for Cheryl and Keng as well as your lemongrass chicken rice rolls (have already made this one a couple of times and it works well!). Will give the yoghurt another go...
ReplyDeleteSigh..wish i could join you guys! Send my greetings to them ya! Glad to hear that the lemongrass rolls went well. Give the lettuce rolls with pork mince a go next time - it's good too.
DeleteIs there any expiry on this home made yogurt? Within how long we must finish the 1L? Hehe :D
ReplyDeleteHi Bing, thanks for dropping by here. Best to finish the yogurt within 1 week, for maximum freshness.
DeleteThanks... Need to find a food thermometer as soon as possible... Can't wait to try it... hehe...
DeleteOr a kid's thermometer will do just fine. You can get it from pharmacies. Good luck! Pl see my earlier comments in replying to Marianne on the fine details of doing it. Hope it works out :) let me know ya.
DeleteMy yogurt failed... hahaha... i doesn't become like tau-fu-fa... It taste like coconut oil and looks runny... :D
DeleteAiyo...can you describe to me your steps and your ingredients? Let's try and troubleshoot :)
ReplyDeleteBoil it to 40++ degree celcius. Pun inside the container and mix in the starter. Cover up and left for 8 hours. After 8 hours straight into the fridge for more than 10 hours. Starter using the same nestle yogurt and marigold low fat milk... :D
DeleteHi Bing, 40++ is almost 50? It is possible that the milk is too hot and has killed the bacteria. Did you add enough starter? 3 tablespoon of starter to 1 litre of milk. Was the starter in smooth creamy form and mixed in with a small portion of milk first before pouring into the rest of the milk? This is a key step to ensure even distribution of the starter. Is the container properly cleaned, dry and free of grease? Was the yogurt "disturbed" much during the first 8 hours of fermentation? If you have done all the steps properly, pls dont give up. Try again, it is worth it! Just takes a bit of experimentation to get the hang of it.
DeleteJust 43c. Starter more than 3 tablespoon. haha... Container is grease free and not disturbed at all during the fermentation. Maybe because i didn't mix the starter with a small portion of milk first before adding it to the rest(this part I forgot). I just stir in the starter to the milk. LoL... Got to give it another try. Thanks Esther. :D
ReplyDeleteHi Bing, try to time the temperature to no more than 41C. And choose a container that you can do all the steps, ie heat the milk, mix the starter, ferment the yogurt and keep in fridge. A large 1litre+ stainless steel mug or pot is ideal. No need to pour into a separate container for the fermentation. And yes, do remember the mixing of starter with a small portion of warm milk first. Fingers cross for your 2nd attempt. I wait for good news ya :)
ReplyDeleteHi Esther! I tried this recipe yesterday and wasn't very successful, and I'm not quite sure why. I followed the directions as described, and added the starter at 41C. I used Oikos brand Greek yogurt, if that makes a difference, but the batch never solidified. It's still just a pot of liquid. What went wrong?
ReplyDeleteHi Barbara, if the milk did not solidify, most probably its due to the starter yogurt bacteria. I've never used greek yogurt as a starter, so i'm not sure if that's the reason. Best to try with regular yogurt, and check that your thermometer works. What's the weather at your part of the world? If its cold, i would suggest you wrap your pot with a towel and keep it inside the microwave for at least 5 hours with the door close to help with the fermentation. Sometimes i do that too.
Delete